Ina :
untuk editan kali ini, pertama tama kamu buka gambar atau foto yang akan di edit. kalo saya pake gambar ini. mumpung ajah, gambar ini lagi kasasar di internet. hehe . . . .
Eng :
edits this time, you first open an image or images to be edited. if i use this picture. During,this picture again on the internet. hehe .....

trus, jangan lupa menggunakan duplikat layer(Ctrl+j) pada gambar atau foto tsb. setelah itu, kamu blur menggunakan Gausian Blur, kira" radiusnya tinggi sampai jerawatnya yang keliatan, nggak nampak lagii ...
contohnya :
radius 11.0
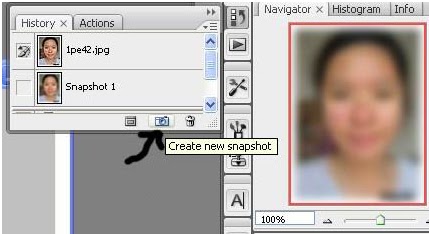
Kalo udah di blur dari pada History di klik 'CREATE NEW SNAPSHOOT'
 |
Eng :
continue, do not forget to use a duplicate layer(Ctrl+j) on the image or photo page. after that, you use the Gaussian Blur , an estimated radius of plasticity higher up acne,not visible anymore ...
example :
radius 11.0
If already in the blur of the History, click the 'CREATE NEW SNAPSHOOT'
Ina :
Udah kan ? ok setelah itu kita undo atau ‘CTRL+Z’ trus taruh sourch nya di snapshoot yang baru aja kita buat tadi ..
Udah ? kalo gitu Nah sekarang pakai tools yang bakalan kita pakai adalah ‘HISTORY BRUSH TOOL’
Trus ganti modenya yang ada diatas dengan ‘DARKEN’
Kalau sudah , sapukan brushnya ke wajah sampe rata , tapi kamu harus ingat ! jangan sampai kena mata , lubang hidung , dan mulut . terus jangan sampe detail wajahnya menghilang . ok !
Trus kalo udah , ganti modenya dengan ‘LIGHTEN’
Sama , sapukan juga ke wajah kaya yang tadi , terus lihat bagaimana hasilnya
intinya Main Darken dan Lighten
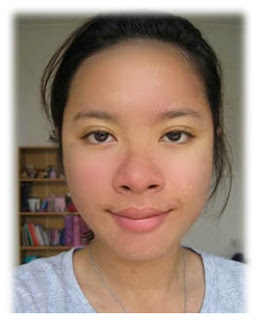
pekerjaan anda .. sebagai pembanding sebelum dan sesudah diedit...
Eng :
Already right? ok after that we undo or 'CTRL + Z' then put it in snapshoot sourch that wejust had made earlier ..
Already? Well if so is now going to use the tools that we use is 'HISTORY BRUSH TOOL'
Now change its mode as described above with the 'Darken'
If so, wipe the face until brushnya to mean, but you must remember! Do not contact with eyes, nostrils, and mouth. continue to do until details of his face disappeared. ok!
Then if already, change its mode to 'Lighten'
Together, brush also had to face the rich, continue to see how the results
Darken and Lighten Main point
your work .. as a comparison before and after editing ...

continue, do not forget to use a duplicate layer(Ctrl+j) on the image or photo page. after that, you use the Gaussian Blur , an estimated radius of plasticity higher up acne,not visible anymore ...
example :
radius 11.0
If already in the blur of the History, click the 'CREATE NEW SNAPSHOOT'
Udah kan ? ok setelah itu kita undo atau ‘CTRL+Z’ trus taruh sourch nya di snapshoot yang baru aja kita buat tadi ..
Udah ? kalo gitu Nah sekarang pakai tools yang bakalan kita pakai adalah ‘HISTORY BRUSH TOOL’
Trus ganti modenya yang ada diatas dengan ‘DARKEN’
Kalau sudah , sapukan brushnya ke wajah sampe rata , tapi kamu harus ingat ! jangan sampai kena mata , lubang hidung , dan mulut . terus jangan sampe detail wajahnya menghilang . ok !
Trus kalo udah , ganti modenya dengan ‘LIGHTEN’
Sama , sapukan juga ke wajah kaya yang tadi , terus lihat bagaimana hasilnya
intinya Main Darken dan Lighten
pekerjaan anda .. sebagai pembanding sebelum dan sesudah diedit...
Eng :
Already right? ok after that we undo or 'CTRL + Z' then put it in snapshoot sourch that wejust had made earlier ..
Already? Well if so is now going to use the tools that we use is 'HISTORY BRUSH TOOL'
Now change its mode as described above with the 'Darken'
If so, wipe the face until brushnya to mean, but you must remember! Do not contact with eyes, nostrils, and mouth. continue to do until details of his face disappeared. ok!
Then if already, change its mode to 'Lighten'
Together, brush also had to face the rich, continue to see how the results
Darken and Lighten Main point
your work .. as a comparison before and after editing ...
Ina : Gimana,, mudahkan...
selamat mencoba... :)
selamat mencoba... :)
Eng : How,, really... good luck ... :)
Tidak ada komentar:
Posting Komentar